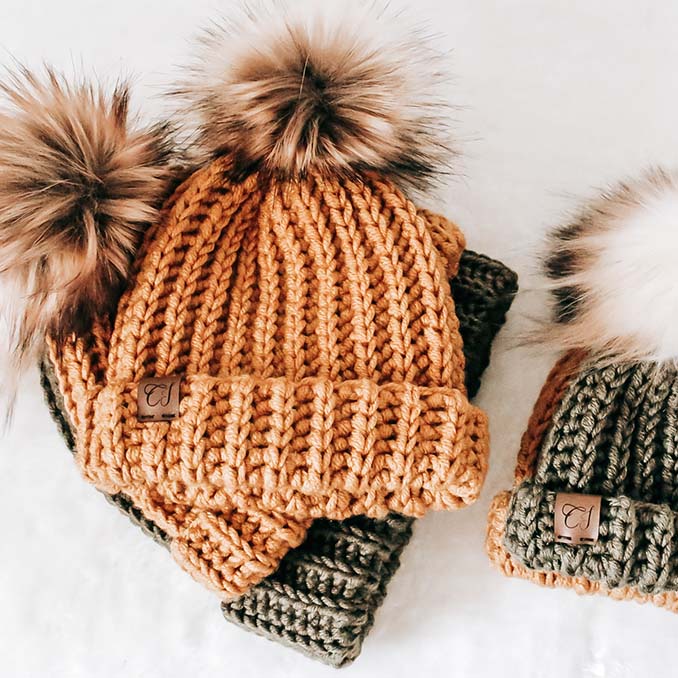
New to the blog! A new member of the Andes collection.
This beautiful and easy hooded scarf will be your staple this winter!
If you’re anything like me, your hair’s probably up most of the time, and hats just aren’t it—this hooded scarf is the perfect fix! You can keep your hair up and stay warm all winter long.
And if you don’t feel like wearing the hood? Just drop it back and use it as a cozy scarf—so easy and cute! 💁♀️🧣
Not ready to crochet yet? Pin this image and get to it later!

This post includes affiliate links which help support the content on CJ Design’s blog. My views are entirely my own. For detailed info, please review our Privacy & Disclosures policy here.
This hooded scarf is a beginner-friendly pattern; we use the same stitch as we have been using for the other patterns of the Andes Collecion (Andes hat, Andes cowl, Andes Headband and Andes Invinity scarf)
About the yarn I used
For this project, I’m using Vanna’s Choice, a yarn that comes in multiple colours. It’s 100% acrylic, easy to wash and crochet with, and oh, so soft!
Feel free to use any other worsted weight yarn that you can find. Some of my favourites are Wool-ease by Lion Brand Yarn and Classic Worsted by Premier Yarns.
About the size & construction
This scarf is the perfect length to wrap around once, and with the added fringes, you get that extra cozy touch.
Want it longer? No problem! Just start with more chains if you love a double wrap. I always suggest making a small swatch to check your tension and doing a bit of math if you want to size it up or down.
Since the hood is part of the scarf, it’s a good idea to toss the chain over your head before starting to see if the length works for you.
The construction is super beginner-friendly. We’ll crochet the full scarf first, then add the hood right in the middle by working a few simple rows and closing them up at the back—easy peasy!

Wash/block your scarf!
If you are using the same yarn as me, or any acrylic, you SHOULD always wash your final project; this will give the fabric more stretch and it will relax the stitches.
In this case, the stitch we are using is very stretchy, making it a bit shorter than the final version (after being washed), so don’t panic when you first finish it, after you throw it in the washer and dryer machine, you will have a super soft and relaxed look of your scarf.
If you would like the ad-free printable pattern PDF, you can get it from Etsy or My Shop and Ravelry. You can also get the KIT here.
Check out more fall patterns


Stitches you should know
- Chain
- Slip Stitch
- Single Crochet
Yarn
You will need Worsted weight yarn, category 4, of any kind. I used Vanna’s Choice by Lion Brand:
Linen – Main Colour: 385g/600m
Notions
Gauge
Pattern Stitch with yarn held double 4″ x 4″: 8 sts x 11 rows. Using a chain of any numbers and a 12 mm hook.
Abbreviations
This pattern uses US standard terms
- BLO – Back Loop Only
- Ch(s) – Chain(s)
- St(s) – Stitch(es)
- YO-SLST – Yarn Over Slip Stitch
- [] – Repeat the sequence in the brackets
General Notes
- Throughout this entire pattern, we will be holding 2 strands of yarn at all times.
- It is not mandatory, but I recommend using stitch markers at both ends of your scarf to make sure you are not accidentally skipping a stitch.
- If you’d like to modify the length, you will need a chain of any numbers. To modify the width, simply continue crocheting more rows.
Special Stitches
YO-SLST: Yarn over, insert your hook into the chain, then yarn over again and pull through the chain and both loops on the hook in one motion.
BLO: Insert your hook in the back loop of the stitch only (the furthest loop from you). Complete the stitch as indicated.

Pattern
The scarf:
Holding 2 strands of yarn together, begin with your foundation chain: Chain 131.
Row 1: YO-SLST BLO in the 2nd ch from the hook, repeat this st across the row. Ch 1 and turn. (130 sts)
Row 2: YO-SLST BLO in the first st available, repeat the st across the row. Ch 1 and turn. (130 sts)
Repeat row 2 for another 15 rows (17 rows in total).
Fasten off.
Making the hood:
From each end of the scarf, count and place a marker in the 45th st. This will leave 40 sts in the center between both markers.
Insert your hook in the first stitch next to the stitch marker, pull up the yarn, and crochet the YO-SLST BLO st back and forth between the markers for a total of 8 rows. (40 sts in total)
Do not fasten off.
Closing the hood:
Fold your scarf and hood in half, insert your hook into the back loop of the first st at the bottom of the hood, then into the front loop on the other side. Use sl sts to seam the back of the hood closed.
(PHOTOS A & B)
Fasten off.
The neckline:
Insert your hook into the first stitch at one end of the scarf (where the bottom or neckline will be), pull up the yarn, and work YO-SLST BLO across the scarf, along the neckline, and down the other side to bring everything together.
Fasten off and weave in the ends.
Final Details:
Add fringes or tassels to give your scarf some extra length and a nice finishing touch. My fringes are around 8 inches long, so cut your yarn twice that length. I used 5 strands of yarn for each fringe and placed them at the end of every row along the edge of the scarf.


And that is it, friends! I hope you enjoyed this pattern as much as I did designing it!
Happy Crochet ~ Dani

